How to Create Asp.Net MVC Core 2.0 Application
In this article
we will learn, what ASP.NET Core, its type and how to create ASP.NET Core 2.0
application with .net.


Question : What is Asp.Net Core 2.0 ?
Answer : ASP.NET Core 2.0 is the new web framework from Microsoft. ASP.NET Core 2.0 is the framework you want
to use for web development with .NET.
Be keep in mind
that .Net Framework and .Net Core Framework both are different to each other.
Question : what is difference
between .Net Framework & .Net Core framework ?
Answer : There are many difference between both. Some are pointed below.
1. The current version of .NET Framework 4.7 while .NET core 2.0.
2. .Net Core is a cross platform that is you can use to develop application on Windows, Linux and MacOS while .Net Framework you can develop application on Windows only.
3. .Net
Framework and .Net Core are two complete separate Frameworks.
Create ASP.NET
MVC Core 2.0 Application step by Step.
Open Visual
Studio go to File -> New->name with "Asp.NetMVCCore2.0Application"

Click on OK
button, then below dialog box will appear.
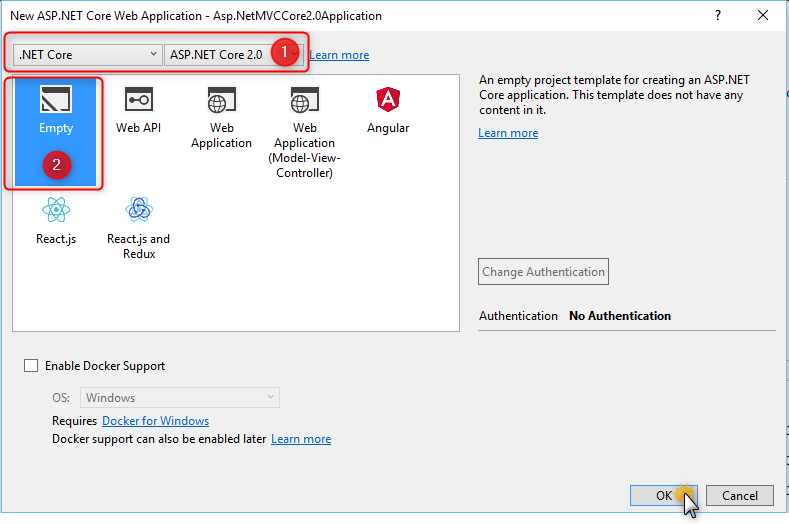
Above screen
shot Point 1 show which version of ASP.NET Core I am using, now option 2 shows
select empty template and then click on OK button.
Now our
application is created successfully. You can see the below snapshot.

Now close this
tab.

Now you can
see our Solution Explorer and it contains very less files.

As you can see
above snapshot there are two files program.cs
and Startup.cs. See the program.cs
code and then Startup.cs.
Program.cs:
using System;
using
System.Collections.Generic;
using System.IO;
using System.Linq;
using System.Threading.Tasks;
using Microsoft.AspNetCore;
using
Microsoft.AspNetCore.Hosting;
using
Microsoft.Extensions.Configuration;
using
Microsoft.Extensions.Logging;
namespace
Asp.NetMVCCore2._0Application
{
public class Program
{
public static void Main(string[] args)
{
BuildWebHost(args).Run();
}
public static IWebHost
BuildWebHost(string[] args) =>
WebHost.CreateDefaultBuilder(args)
.UseStartup<Startup>()
.Build();
}
}
Startup.cs:
using System;
using
System.Collections.Generic;
using System.Linq;
using System.Threading.Tasks;
using
Microsoft.AspNetCore.Builder;
using
Microsoft.AspNetCore.Hosting;
using Microsoft.AspNetCore.Http;
using
Microsoft.Extensions.DependencyInjection;
namespace Asp.NetMVCCore2._0Application
{
public class Startup
{
// This method gets called by the runtime. Use this
method to add services to the container.
// For more information on how to configure your
application, visit https://go.microsoft.com/fwlink/?LinkID=398940
public void
ConfigureServices(IServiceCollection services)
{
}
// This method gets called by the runtime. Use this
method to configure the HTTP request pipeline.
public void
Configure(IApplicationBuilder app, IHostingEnvironment env)
{
if
(env.IsDevelopment())
{
app.UseDeveloperExceptionPage();
}
app.Run(async (context)
=>
{
await
context.Response.WriteAsync("Hello
World!");
});
}
}
}
If solution or projects successfully created then rebuild the solution because for update latest version. Now rebuild the application.

When start the rebuild our project and finished this update, output window show the message which is given below.

After rebuild successfully, Run
this application and show the output.

You can implement MVC inside Asp.Net Core 2.0, for implement MVC we need to three folders respective Controllers, Models, Views. After created successfully.

Add a
controller with name “Home” and you can see snpashots.

After click on
controller button you can see here controller dialog box appeared like MVC
Application but I am using it in ASP.NET MVC Core 2.0 Application.

Now click on
MVC Cotnroller button and then our controller dialog box will appear and I created it with
name “Home”.

Now you can see then code over here.
Program:
using System;
using
System.Collections.Generic;
using System.Linq;
using System.Threading.Tasks;
using Microsoft.AspNetCore.Mvc;
namespace
Asp.NetMVCCore2._0Application.Controllers
{
public class HomeController : Controller
{
public IActionResult
Index()
{
return View();
}
}
}
Now Add view
of Index Action.
@{
ViewData["Title"] = "Index";
}
<h2>This
is my first Asp.Net MVC Core 2.0 Application. </h2>
Before implement MVC in this application you can see the code of Startup.cs
In the above code inside ConfigureServices Method there is no any method and Configure Method only two conditions are available. For implementing the MVC inside Asp.Net Core 2.0.We have to change some code in Startup class.
We have to need use services.AddMvc() method inside ConfigureServices and add useapp.UseMvc(routes=> { routes.MapRoute(name:"default",template: "{Controller=Home}/{Action=Index}/{id?}"); }); inside Configure method. Which you can see the below code snippet.
Before implement MVC in this application you can see the code of Startup.cs
using System;
using System.Collections.Generic;
using System.Linq;
using System.Threading.Tasks;
using Microsoft.AspNetCore.Builder;
using Microsoft.AspNetCore.Hosting;
using Microsoft.AspNetCore.Http;
using Microsoft.Extensions.DependencyInjection;
namespace Asp.NetMVCCore2._0Application
{
public class Startup
{
// This method gets called by the runtime. Use this method to add services to the container.
// For more information on how to configure your application, visit https://go.microsoft.com/fwlink/?LinkID=398940
public void ConfigureServices(IServiceCollection services)
{
}
// This method gets called by the runtime. Use this method to configure the HTTP request pipeline.
public void Configure(IApplicationBuilder app, IHostingEnvironment env)
{
if (env.IsDevelopment())
{
app.UseDeveloperExceptionPage();
}
app.Run(async (context) =>
{
await context.Response.WriteAsync("Hello World!");
});
}
}
}
We have to need use services.AddMvc() method inside ConfigureServices and add useapp.UseMvc(routes=> { routes.MapRoute(name:"default",template: "{Controller=Home}/{Action=Index}/{id?}"); }); inside Configure method. Which you can see the below code snippet.

Now run this application behalf of MVC. We have to change some code in Startup class.

Conclusion : In this article we learn how to create Asp.Net Core 2.0 latest version using Asp.Net simple page and implement it in MVC.


Leave a Comment