Setup Angular 2.0 Application using Angular CLI
In this article we will learn how to Create Angular 2 Application,What should softwares are require for it,how to and from, where I install it.
Introduction:
AngularJs 2 is a javascript framework it is build up with module, directive, service, dependency injection. All the existing things of Angular js 1.xx is available in Angular JS 2.0 is and improved quality. Angular Js 2.0 is totally different from Angular Js 1.0. because it is totally new framework and written in different language (TypeScript).
Angular JS 1.0 Application Overview
AngularJS 2.0 Overview
Bind DropDownList Using AngularJS 1.0
What Is TypeScript?
Disadvantage:
In Angular JS 2 most of component is required Online in beginning.A new language is joined with Angular JS 2.0, which is TypeScript. If those who not know about TypeScript then he take long time to learn it because it is new for this.
Pre-requirement:
1. 1. Install Node.js
· Download from Download Node.js
· Check Node.js is installed successfully or not open command prompt and write command npm -version or npm version
2. 2 Install Angular-CLI Downlaod Angular CLI
Install angular -CLI by using npm install -g angular -cli command
Create new Angular JS Application:
Let's Start :
I am going to create a new Angular 2.0 application step by step.
Step 1: Open a command prompt create a folder where you keep you project. I am creating a folder inside E drive which name is “Anguar2”.

In above screen-shot point 1- create a directory with name Angular2 using md command and then go to inside it using cd directory name. Now finally I entered inside directory ( E:\Angular2). Now you can see my machine Angular2 directory is created inside E drive.

Before create any application, here check in my machine Node.js is installed
or not via npm -version command in my machine it is already installed.

Or you can check using npm version command

If it’s not install in your machine, so install it by using above link.Now I will check here that Angular CLI is created in my machine or not for check it use
ng –-version command open command prompt and check it.

As you can see in my machine it is already installed. If it is not in your machine then use npm install -g angular -cli command.
Step 2: Open command prompt and create new project using ng new <project name>, new project named is "Angular2firstApp" and it takes some time write a hole command for create a new project inside
E:\Angular2\ Angular2firstApp directory by using command
New Angular2firstApp after enter this command Angular2FirstApp is creating as you can see below for create a new project it takes few minutes because all file and folder created online so it takes some time.


Now you can see Angular2FirstApp is created means this step installed all necessary files and dependency library inside this project. we can also check in project directory which is created by us (E:\Angular2\ Angular2firstApp).

Here point 1 denoted solution or project directory and point 2 all necessary files which is required for angular 2 applications for run it.
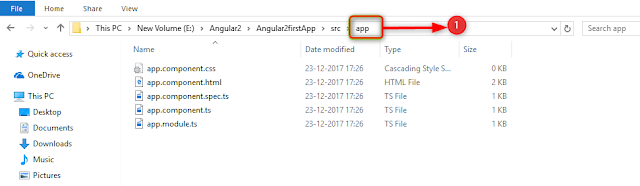
As you can see above screen-shot point denoted app folder which is very necessary and it’s all five files are also necessary, because all these files are use in always.
I will describe earch and every file in next article.
ap.component.html. file is the main file for this application.
Therefore, app.component.ts define main selector.
import { Component } from '@angular/core';
In ap.component.html page message is already written Runn this project you have to follow two steps. Open command prompt
Go inside project folder by using cd Angular2firstApp command and,
Use ng serve command
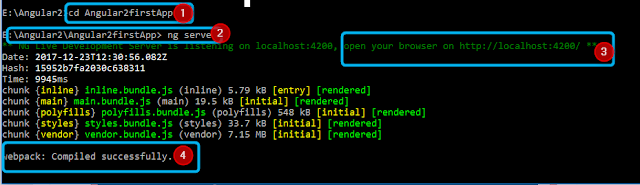
In above screen shot describe below
denote that go inside the application folder
run the project and
launch your browser for run your project mean copy this URL and paste in your browser then run your application.
Successfully compiled.
Output:

All these message is by default, If you want to remove all text and want to add your own text then edit in ap.component.html file.
Let’s Ouptput:

I will describe each and every page of angular2 with details in next article.
Introduction:
AngularJs 2 is a javascript framework it is build up with module, directive, service, dependency injection. All the existing things of Angular js 1.xx is available in Angular JS 2.0 is and improved quality. Angular Js 2.0 is totally different from Angular Js 1.0. because it is totally new framework and written in different language (TypeScript).
Angular JS 1.0 Application Overview
AngularJS 2.0 Overview
Bind DropDownList Using AngularJS 1.0
What Is TypeScript?

Disadvantage:
In Angular JS 2 most of component is required Online in beginning.A new language is joined with Angular JS 2.0, which is TypeScript. If those who not know about TypeScript then he take long time to learn it because it is new for this.
Pre-requirement:
1. 1. Install Node.js
· Download from Download Node.js
· Check Node.js is installed successfully or not open command prompt and write command npm -version or npm version
2. 2 Install Angular-CLI Downlaod Angular CLI
Install angular -CLI by using npm install -g angular -cli command
Create new Angular JS Application:
Let's Start :
I am going to create a new Angular 2.0 application step by step.
Step 1: Open a command prompt create a folder where you keep you project. I am creating a folder inside E drive which name is “Anguar2”.

In above screen-shot point 1- create a directory with name Angular2 using md command and then go to inside it using cd directory name. Now finally I entered inside directory ( E:\Angular2). Now you can see my machine Angular2 directory is created inside E drive.

Before create any application, here check in my machine Node.js is installed
or not via npm -version command in my machine it is already installed.

Or you can check using npm version command

If it’s not install in your machine, so install it by using above link.Now I will check here that Angular CLI is created in my machine or not for check it use
ng –-version command open command prompt and check it.

As you can see in my machine it is already installed. If it is not in your machine then use npm install -g angular -cli command.
Step 2: Open command prompt and create new project using ng new <project name>, new project named is "Angular2firstApp" and it takes some time write a hole command for create a new project inside
E:\Angular2\ Angular2firstApp directory by using command
New Angular2firstApp after enter this command Angular2FirstApp is creating as you can see below for create a new project it takes few minutes because all file and folder created online so it takes some time.


Now you can see Angular2FirstApp is created means this step installed all necessary files and dependency library inside this project. we can also check in project directory which is created by us (E:\Angular2\ Angular2firstApp).

Here point 1 denoted solution or project directory and point 2 all necessary files which is required for angular 2 applications for run it.

As you can see above screen-shot point denoted app folder which is very necessary and it’s all five files are also necessary, because all these files are use in always.
I will describe earch and every file in next article.
ap.component.html. file is the main file for this application.
- <!--The content below is only a placeholder and can be replaced.-->
- <div style="text-align:center">
- <h1>
- Welcome to {{ title }}!
- </h1>
- <img width="300" alt="Angular Logo" src="data:image/svg+xml;base64,PHN2ZyB4bWxucz0iaHR0cDovL3d3dy53My5vcmcvMjAwMC9zdmciIHZpZXdCb3g9IjAgMCAyNTAgMjUwIj4KICAgIDxwYXRoIGZpbGw9IiNERDAwMzEiIGQ9Ik0xMjUgMzBMMzEuOSA2My4ybDE0LjIgMTIzLjFMMTI1IDIzMGw3OC45LTQzLjcgMTQuMi0xMjMuMXoiIC8+CiAgICA8cGF0aCBmaWxsPSIjQzMwMDJGIiBkPSJNMTI1IDMwdjIyLjItLjFWMjMwbDc4LjktNDMuNyAxNC4yLTEyMy4xTDEyNSAzMHoiIC8+CiAgICA8cGF0aCAgZmlsbD0iI0ZGRkZGRiIgZD0iTTEyNSA1Mi4xTDY2LjggMTgyLjZoMjEuN2wxMS43LTI5LjJoNDkuNGwxMS43IDI5LjJIMTgzTDEyNSA1Mi4xem0xNyA4My4zaC0zNGwxNy00MC45IDE3IDQwLjl6IiAvPgogIDwvc3ZnPg==">
- </div>
- <h2>Here are some links to help you start: </h2>
- <ul>
- <li>
- <h2><a target="_blank" rel="noopener" href="https://angular.io/tutorial">Tour of Heroes</a></h2>
- </li>
- <li>
- <h2><a target="_blank" rel="noopener" href="https://github.com/angular/angular-cli/wiki">CLI Documentation</a></h2>
- </li>
- <li>
- <h2><a target="_blank" rel="noopener" href="https://blog.angular.io/">Angular blog</a></h2>
- </li>
- </ul>
Therefore, app.component.ts define main selector.
import { Component } from '@angular/core';
- import { Component } from '@angular/core';
- @Component({
- selector: 'app-root',
- templateUrl: './app.component.html',
- styleUrls: ['./app.component.css']
- })
- export class AppComponent {
- title = 'app';
- }
In ap.component.html page message is already written Runn this project you have to follow two steps. Open command prompt
Go inside project folder by using cd Angular2firstApp command and,
Use ng serve command

In above screen shot describe below
denote that go inside the application folder
run the project and
launch your browser for run your project mean copy this URL and paste in your browser then run your application.
Successfully compiled.
Output:
All these message is by default, If you want to remove all text and want to add your own text then edit in ap.component.html file.
- <!--The content below is only a placeholder and can be replaced.-->
- <div style="text-align:center">
- <h1>
- Welcome to {{ title }}!
- </h1>
- </div>
- <h2>Here are some links to help you start: </h2>
- <ul>
- <li>
- <h2><a target="_blank" rel="noopener" href="https://angular.io/tutorial">My First Angular2 Application</a></h2>
- </li>
- </ul>
Let’s Ouptput:

I will describe each and every page of angular2 with details in next article.


Leave a Comment